I posted a new freehand tutorial,
Ultramarines 2nd Company icon on a cape, on the Relic forums as part of the freehand banner contest.
Labels: News, Technique, Tip, Tutorial

Materials:
Wooden Base - craft store
3/4" x 10" square acrylic rod - plastics shop
Glue, gravel and base materials
1/2" rare earth magnets - K & J Magnetics
Two part plastic to anything epoxy
I measured the base to find the center and simply epoxied the bejebbus out of the rod. I added two of the 1/2" magnets to the top using the same epoxy and one of them to the bottom of the Thunderbolt.
After the epoxy was dried (I waited 10 minutes) I went back in with my gravel and debris.
I was hoping that the magnets would be just strong enough to allow me to lift the entire display, base and all, by the flyer. It's not. It's strong enough to survive the customary bumps that come with life on a shelf.
Labels: Bases, Commission, Forgeworld, Magnets, Technique, vehicle, WIP
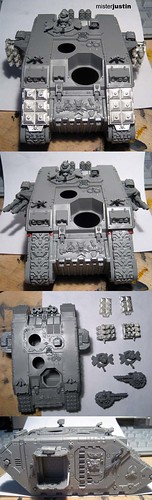
High temperatures recently have made it impractical to paint, and impossible to prime anything, so I decided to jump in on putting together a new model. Right away I knew it would be my new Land Raider but I couldn't decide whether to put it together as a plain ol' Land Raider or as the fancy Land Raider Crusader... which got me wondering why it had to be one or the other.
Thank you rare earth magnets.
I put together the body in the normal fashion and embedded four rare earth magnets (1/8" x 1/32" each) in to the top sponson mount on each side.
I cut the top pivot from each of the sponson weapons and added magnets there instead -- two each to the Crusader sponsons, because they're metal, and one each to the standard plastic weapons.
The red dots on the front helped me mark where to embed the tiny 1/16" x 1/32" magnets to hold the Crusader frag launchers in place. There are six of the tiny magnets in the body and three in the launcher... for each hole. The more magnets the better the hold - and I can hold this thing upside down without anything falling off.
The pintle gunners will be swappable as magnets won't really work there. I will also make the front mounted guns swappable once I order a second housing.
When I'm finished it won't take more than a few seconds to switch between a Land Raider and a Land Raider Crusader.
Of course I don't have one in my 750 point army list but it will still be a pleasure to paint... as soon as I'm done with at least one other project.
Labels: conversion, Magnets, Technique, vehicle, WIP
While working on the Kharn model I decided to put together a wet pallete to help with the NMM blending. I took an old blister pack, cut a sponge, and picked up some baking parchment at the grocery store.
Now I'm in love.
The paint not only stayed wet while I was working on the model for more than an hour -- but when I came back to the den after dinner and a movie... yup, most of the paint was still wet.
For any blended colours this technique is going to be invaluable.
Thank you, internet!
Labels: Technique, Tip
