It's been awhile since I updated my Leman Russ project so I thought I'd post another WIP shot. I did the snow on this one at the same time as the Thunderbolt base... and managed to get the snow weathering BACKWARDS on the treads. Oops. Note that all of the snow is at the FRONT of the vehicle and not the back. I'll be fixing that shortly. I also intend to add mud to the tracks, undercarriage and track marks - as well as water effect to the engine compartment to show where snow has melted on the hot metal. I had originally planned to add several guardsmen slogging along behind the tank. I'm going to save those for another project and just get this one finished so that it's not distracting me much longer. I have far too many big projects on the table right now. Labels: Bases, GW, Imperial Guard, vehicle, WIP
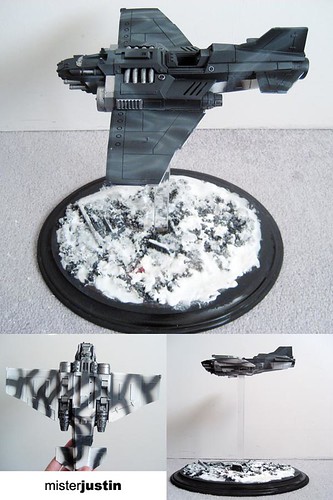 An early update on the Thunderbolt project. I am quite pleased with how the split urban camo scheme worked out - although I think that the snow on the base is a bit thick. There is still a lot of work to be done, of course. I'll add all of the detailing, weathering, chipping, wind streaking along the wings... some techniques that I've never applied before. This project has been a real pleasure and I intend to re-use the base idea for every future flyer. Labels: Bases, Commission, Forgeworld, GW, Imperial Guard, vehicle, WIP
 Materials: Wooden Base - craft store 3/4" x 10" square acrylic rod - plastics shop Glue, gravel and base materials 1/2" rare earth magnets - K & J Magnetics Two part plastic to anything epoxy I measured the base to find the center and simply epoxied the bejebbus out of the rod. I added two of the 1/2" magnets to the top using the same epoxy and one of them to the bottom of the Thunderbolt. After the epoxy was dried (I waited 10 minutes) I went back in with my gravel and debris. I was hoping that the magnets would be just strong enough to allow me to lift the entire display, base and all, by the flyer. It's not. It's strong enough to survive the customary bumps that come with life on a shelf. Labels: Bases, Commission, Forgeworld, Magnets, Technique, vehicle, WIP
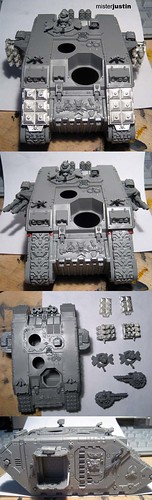 High temperatures recently have made it impractical to paint, and impossible to prime anything, so I decided to jump in on putting together a new model. Right away I knew it would be my new Land Raider but I couldn't decide whether to put it together as a plain ol' Land Raider or as the fancy Land Raider Crusader... which got me wondering why it had to be one or the other. Thank you rare earth magnets. I put together the body in the normal fashion and embedded four rare earth magnets (1/8" x 1/32" each) in to the top sponson mount on each side. I cut the top pivot from each of the sponson weapons and added magnets there instead -- two each to the Crusader sponsons, because they're metal, and one each to the standard plastic weapons. The red dots on the front helped me mark where to embed the tiny 1/16" x 1/32" magnets to hold the Crusader frag launchers in place. There are six of the tiny magnets in the body and three in the launcher... for each hole. The more magnets the better the hold - and I can hold this thing upside down without anything falling off. The pintle gunners will be swappable as magnets won't really work there. I will also make the front mounted guns swappable once I order a second housing. When I'm finished it won't take more than a few seconds to switch between a Land Raider and a Land Raider Crusader. Of course I don't have one in my 750 point army list but it will still be a pleasure to paint... as soon as I'm done with at least one other project. Labels: conversion, Magnets, Technique, vehicle, WIP
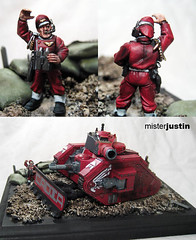
 The only vehicle in my 750 point army list - this one lone Razorback is going to need to find a way to get across the table and deliver my only shooty Marines. Good luck with that, little Razorback. Despite being cannon fodder I'm pretty pleased with the vehicle. Having decided to redo my army if I decide to keep playing I went ahead and put more effort in to the only vehicle. I can field it as it is and be happy with it and put more detail in later - although I think I'm going to break my own rules and do some of that detailing now. It's getting harder to keep on track with this 750 point army. This is especially true when I want to go back and completely redo so many of the miniatures. Ah well, tabletop first.... Labels: Army Blog, Black Templar, GW, Space Marines, WIP
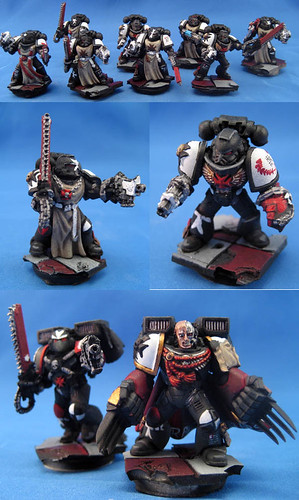 The first eight of my Black Templar Initiates are finished. Each is standing on one of the resin cast bases I made for this army. BT symbols on the helmets are very much in evidence - although I have otherwise kept detailing to a minimum to help me get this army on the table. Included at the bottom is the Marshal complete with his magnetic lightning claws and my Assault Marine test model. I have a pair of the Assault legs magnetized and ready to paint - that will let me swap the Marshal either way to match current and future lists. Of course now I plan to completely recast my bases... but that a topic for another post. Labels: Army Blog, Black Templar, GW, Magnets, Space Marines, WIP
 This guy is finally finished. I have him sealed, set aside, and ready to use with my army. He is sitting on one of the bases I made for my Black Templar army - and I've added a white casing to his bolt pistol to make him match the squad he'll attach to. It's nice finally seeing some progress on this project. The idea that I might actually get an army on to a table in July is starting to seem like a reality. A very geeky reality. Labels: Army Blog, Black Templar, GW, Space Marines, WIP
 Just about finished with this one. Of course now that I actually have a 750 point Black Templar list it turns out I'm not actually going to use him. Ah well. He has been fun to paint and I'm quite happy with the conversion. Labels: Army Blog, Black Templar, conversion, GW, Space Marines, WIP
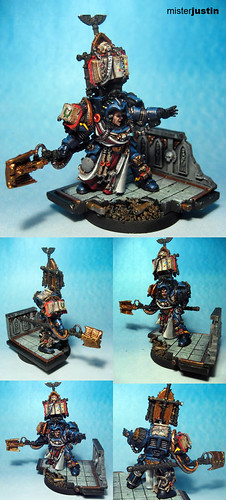
Still some clean-up and highlighting to do, otherwise I'm pretty pleased with this guy. Like the Marshal and Emperor's Champion he's being done to a high gaming standard so that I can get him on the table. Unlike the previous command models this one was actually quite a conversion, of course, and I hope to go back and give him some proper painting attention later. I'll finish out the crozius with a red handle and add some more white to the skulls. I will probably also go in and add some shading to the white on his robes... but we'll see whether I do that or start in on the squads next. All-in-all quite pleased with how the army is coming along; even if I only have three models on which to base my opinion. Labels: Army Blog, Black Templar, conversion, GW, Space Marines, WIP
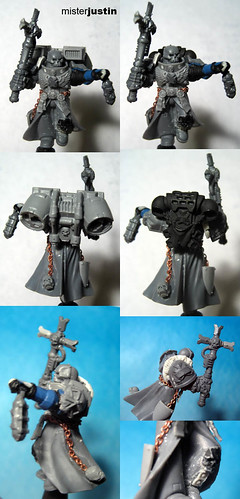 I got a lot of feedback on this guy when I posted him to a couple of servers and this prompted a number of changes:
- Replaced the sculpted chain with actual chain
- Added the skull and shield to the chain
- Replaced the off sized arm on the crozius
- Resculpted the decoration on the left leg
- Sculpted TEMPLAR on to the right pauldron
- Resculpted left hand to be closed instead of pointing
- Modeled with magnetic backpacks in place
I'm quite pleased with the changes for the most part - but now I can't decide whether or not he needs any additional purity/crusade seals. I am particularly ambivalent about the ones I had on his neck. I like the idea of adding long flowing seals, like vestments for this chaplain, but do have to agree that the last round was overkill. Labels: Black Templar, conversion, GW, Space Marines, WIP
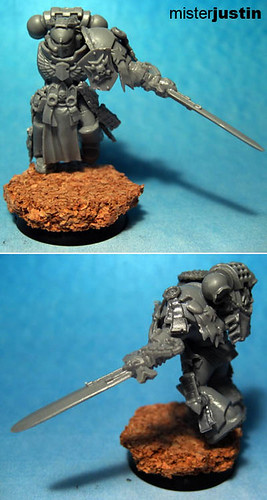
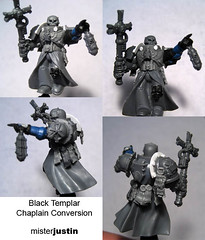 Playing with conversions today and got this guy to a point I'm happy with. There's still some greenstuff work to come -- going to give him vestments and do something on his legs. No backpack on him at the moment as I will make it magnetic so I can swap those with the Marshal. He'll wind up being able to use one of the jump packs or the BT backpack. This fella also took with him a big chunk of my thumb and left a long gash in one of my fingers. Everying people tell you about appropriate use of sharp craft blades is true. Go figure. Labels: Black Templar, conversion, GW, Space Marines, WIP
 This model had been the bane of my existence thanks to a 2mm gap that I couldn't get rid of. Problem finally solved I've gotten the model together and finally started to be able to show some progress. There's still a long way to go - including a simple display base - but I'm glad to be working on it again. For awhile it simply made me cry. Labels: Commission, Forgeworld, Imperial Guard, WIP
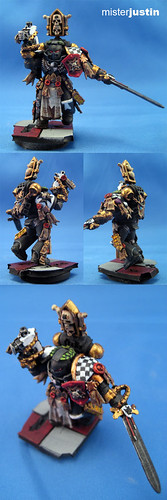
 After entering in the Relic painting competition I was inspired to try another model -- this one is for a local competition. Everyone has one month to paint this bad boy; he's due the first Sunday in May. I'm probably 75-80% finished already but want some suggestions on the force staff. I've tried to do source lighting again -- not object source (OSL) -- and highlighted the armour as though the light were slightly forward and on his left side. When I get him in to the photo box this effect should show up better. It is most visible on his pointing arm where it's nearly black except for the light blue on the top. Labels: Competition, GW, Space Marines, WIP
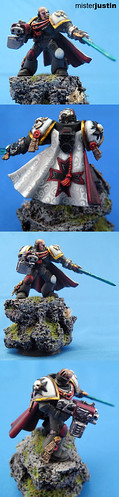 I'm so close to finished that I can taste it. It is delicious! I'll be very glad to set this model aside for awhile and get back to Kharn and my display tank. I'm pleased with the overall result but still a bit disappointed that he's not on the same level as the Kharn model. I expect this guy and a couple sets of arms to find his way to eBay once I get a new commander put together for my 750 point list. I still need to finish highlighting the armour and detail the sword -- otherwise I think that this guy is ready to go. I've seen a couple of the other entries for the competition now -- and while I know I don't have much of a chance I'm still glad to be entering and competing. I've learned a lot between this and the Kharn model; both of which were intended for this competition and both of which got more attention that my usual efforts. One week from tomorrow.... Labels: Black Templar, Competition, GW, Magnets, Space Marines, WIP
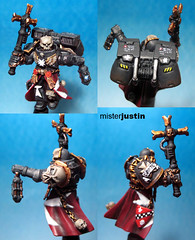
 I got home too tired to really paint tonight so I decided to do some modeling for my army with the few BT bits I have on hand. Having made the two test models that I debuted with my magnetic commander I was, however, out of Black Templar torsos. I found a Company Champion torso in my bits box and decided that it was perfect usable in my BT army - and perfectly unique enough in the scheme to fit for a character model. And so... here is the "Emperor's Champion" model for my 750 point Black Templar army. My goal with the army is to use only existing GW pieces off of the sprue with no conversion, no sculpting and no plasticard additions. I really want to see what the GW plastic models are capable of... and so far I'm pretty happy with the results. I'm waiting on a bits order to get the BT bolt pistol for his right hand. I will use one of the BT shoulders on that side and, of course, more decorative bits. So far he's up to 11 purity/crusade seals -- and I found a BT backpack topper in my bits box. Of course I'm so happy with this piece that I will probably make a new body for my magnetic commander. If he's going to be the centerpiece of my army I figure he ought to be at least half as bad ass as this guy. Labels: Army Blog, Black Templar, GW, Space Marines, WIP
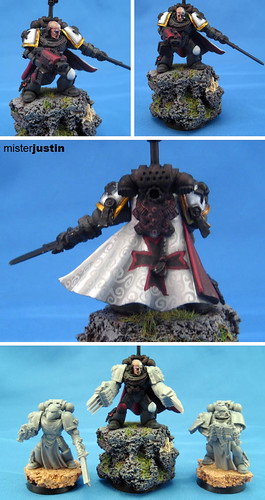 I finally (finally!) have an update image on my magnetic Black Templar commander. This is the model that I will be entering in to the Relic competition (with only 2 weeks to go, eep!) -- and what will become the centerpiece of my 750 point army. Yup, I'm finally (finally!) going to give playing a try again. The last time I played we were all being amused by the new 2nd edition rule set. Ah, those were the days. So now I have a couple of 750 point lists drawn up and hope to hit the tables this summer. The last shot in this image shows the commander with twin lightning claws next to two test models. The next image is just a sample from the Black Templar dreadnought I've been working on. I haven't done anything but the two weapons -- and I'm not sure I'll use them if I actually build a list. Regardless of whether or not I wind up fielding this army I think it'll be a good exercise -- and if nothing else it will be good practice. 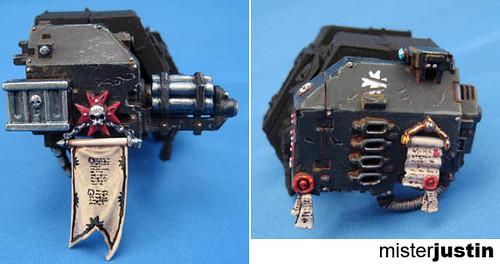 Labels: Black Templar, Competition, conversion, GW, Magnets, Space Marines, WIP
 I redid all of the NMM gold -- I have also done the bulk of my NMM steel. I do intend to go over the chains with some rust and dirth but only when I'm ready to weather the whole model. The 40 mm base was made from Super Sculpey. Still a bit of work to do including the gun, axe, finishing the backpack and general clean-up and weathering. I hope to finish him today so that I can get back to my competition entry... which I haven't touched since I picked this guy up. Labels: Chaos, GW, NMM, WIP
 This is the first actual WIP image for the model. And, so far, some of my best work to date. This includes extensive layering on each colour and non-metal metallic (NMM) gold. This is my first foray in to the world of NMM and while it was a pain (and I'll do it differently next time, of course) I'm pleased with the overall result. More to come -- but I finally feel like I might actually compete with the other folks in my tier. [UPDATE: Denied! I will not be able to enter this model in to the competition - I did too much work on him for everyone to feel comfortable beliving that it's only 2.5 hours - or started *after* the competition began. So back to my original model.] Labels: Chaos, Competition, GW, WIP
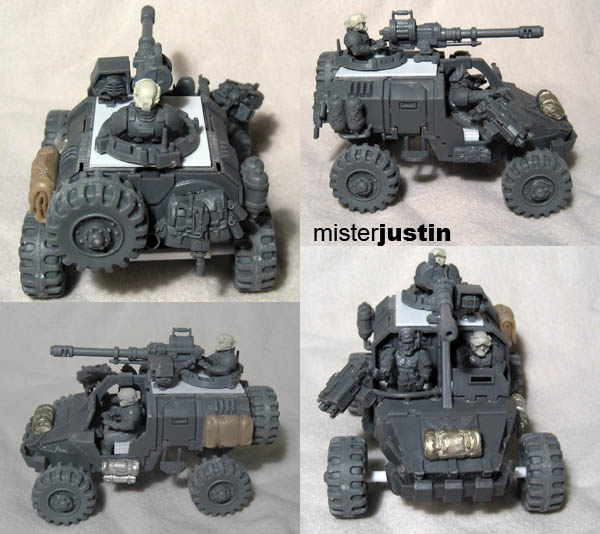 This incredible conversion arrived today with a collection of miniatures for my next commission. This client is fantastic and always sends me the most interesting things to paint. There are several other pieces in this shipment that I can't wait to paint -- but more on those later. I'm really looking forward to painting this one and hope that I can capture the character of it appropriately. The little details are just a wonder -- and while the body came from a Land Speeder you really wouldn't know it given how seamlessly the whole thing comes together. Labels: Commission, conversion, GW, Imperial Guard, WIP
 Another set of arms finished today; the only up side to being home sick, I suppose. I also finished the cloak and included the symbols of Sigmar in freehand... but I'm not entirely pleased with the result and hope for some feedback. At this stage only two sets of arms, two heads and one body to go. Oi. For now it's time to take a break. Labels: eBay, Empire, GW, Magnets, WFB, WIP
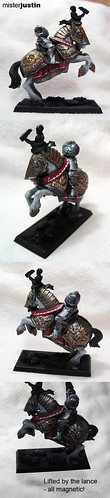 I got some painting done on this guy today. Unfortunately the metallics are so reflective that the whole thing looks totally washed out. This is actually quite likely the best painting I've ever done. The last image is me lifting the entire model by the tip of the lance. I managed to pick up and move the model across the room -- all holding on to the lance that was simply attached via the magnet. Fun stuff. Now I'm off to find a tutorial on photographing metallic paints. I'm hoping to have the finished product on eBay within two weeks. Labels: Empire, GW, Magnets, WFB, WIP
 The first of the Cadian guards for the display base is finished. I started with the tank commander that came with the model and I'm pretty pleased with the result. Now that the model is starting to come together I no longer plan on keeping the "CADIA" text on the dozer blade. I will probably strip this and replace it with the Cadian flag or similar iconography. Labels: GW, Imperial Guard, vehicle, WIP
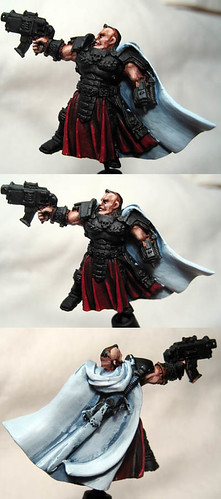 I received a second commission order from Jacob - this time for an Inquisitor and his retinue. I got to spend an hour working on this one to get the base colours set and give me a better direction for the rest of the work. In this case I was given free reign on colour decisions and plan on doing the armour in a dusty black - some freehand on the cape - and otherwise in what is present. I chose a blue shading on the cape to add some additional depth and make it look a bit cooler. While there is still a lot of clean up to do I am happy with the overall effect and think it will look fantastic with a nice Inquisitorial symbol in the middle of it. I'm rather pleased with how the flesh tones turned out but they're not as sooth as I might like. Labels: Commission, Daemonhunters, GW, Inquisitor, WIP
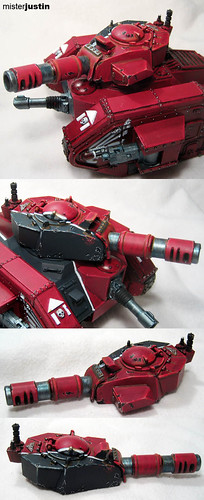 I finally had an opportunity to put some time in to the Leman Russ project again. In this case I based all of the gun barrels in a gunmetal blue;added the Cadian gate iconography to the front of the tank; and completed the highlighting and first round of details on the turret. I also managed to get a GIANT RED FINGERPRINT on the finished black side of the turret. I will correct this when I go back in to highlight and detail the body. The turret took about two hours to get from the base colour to the current state. I expect to put in another hour before I decide it's finally finished... not counting the application of snow when the model is finished. It's likely to be awhile before I come back to this one, however, as the next commission models just arrived. Labels: GW, Imperial Guard, vehicle, WIP
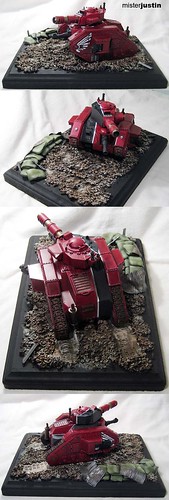 Not a lot of progress at this point but I am very happy with what has been done. Overall I think that the model is progressing very well and may well be competition worthy if I ever manage to finish... and stop changing my mind about the details and little touches. Something learned: if you're going to attach a vehicle to a display base mark out the location before adding any basing materials... and leave that area bare. I had to go back in with a screwdriver and clear spots for the tank to sit - otherwise it was sitting too high, didn't rest on the tread marks I had added, and ultimately looked like an afterthought. I plan to make some additional progress tonight and should have an update to post in the next couple of days. I would like to have this one finished within the next couple of weeks so that I can focus on other projects. Here's hoping. Labels: GW, Imperial Guard, vehicle, WIP
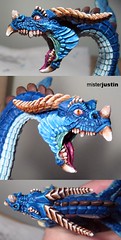
After someone showed me Forgeworld's incredible "Fire Dragon" I had to go and did one of my old dragons out of a box. The largest, and most visually impressive, of those was the "Ultimate Dragon" from Grenadier - circa early 1990s. I spent several days filing, pinning and gap filling. At this point I have probably put 4-6 hours in to prep and 6-10 in painting. I had started with drybrushing and washes to pick out highlights on the scales -- but just wasn't getting the effects I wanted. I am now painting each individual scale. At this stage I consider his face (and only his face) close to finished. I do think that I'm going to change the colour of the small scales next to his mouth. I also need to finish his tounge but then I'm going to leave the face alone for awhile so I don't over-correct it. The rest of the model has a long, long way to go. Labels: WIP
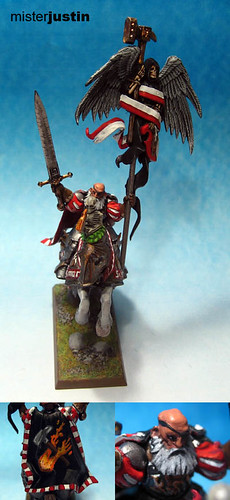
My wife is beginning to think that I'm crazy. As I improve the models I'm interested in painting are taking longer and longer to finish -- but are, of course, packed with a greater and greater degree of detail. Now when I talk to the award winning painters and find out they'll spend at least 45 minutes on a face I'm not as surprised. This guy was a lot of fun and bits of him are certainly the best work that I have done to date. There are a few little things that I would like to go in and change but I know better than to fiddle with him at this point. Putting him down is the hardest part though. Size comparison: the circle on the banner is smaller than a dime and is just a touch over .25 inch. The little man, including his base, is 1.25 inches tall. Now it's on to the next piece - and forcing myself to finish the pieces on my table that I am no longer interested in. I also got another shipment of tanks and vetrans on commissions which are going to be fun to paint. YAY HOBBY! 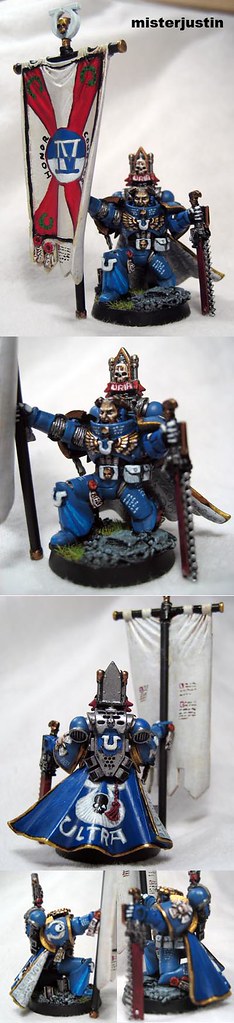 Labels: GW, Space Marines, WIP
|