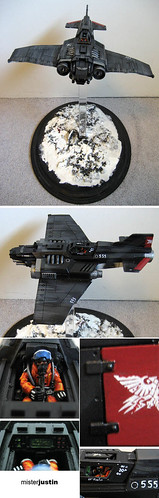
 This long time project is finally finished, packed and out in the mail to Niroe. Although I started his Valkyrie first I still have that one on the table - it should also be finished this week. Although the snow wound up a bit thicker than I had intended I'm still pleased with the base on this one. The model uses more rare earth magnets to attach to the base. This was also the first time I'd put my trust in to decals and tried the gloss coat/decal/gloss coat/paint method that I have recommended to so many others. Turns out it works just fine... which I suppose I knew. I simply hate applying decals. There are a lot of detail shots for this guy floating around and I'll see what I can do about putting together some better composite images. Labels: Bases, Commission, Forgeworld, GW, Imperial Guard, Magnets, vehicle
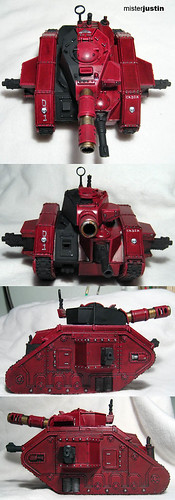
 It's been awhile since I updated my Leman Russ project so I thought I'd post another WIP shot. I did the snow on this one at the same time as the Thunderbolt base... and managed to get the snow weathering BACKWARDS on the treads. Oops. Note that all of the snow is at the FRONT of the vehicle and not the back. I'll be fixing that shortly. I also intend to add mud to the tracks, undercarriage and track marks - as well as water effect to the engine compartment to show where snow has melted on the hot metal. I had originally planned to add several guardsmen slogging along behind the tank. I'm going to save those for another project and just get this one finished so that it's not distracting me much longer. I have far too many big projects on the table right now. Labels: Bases, GW, Imperial Guard, vehicle, WIP
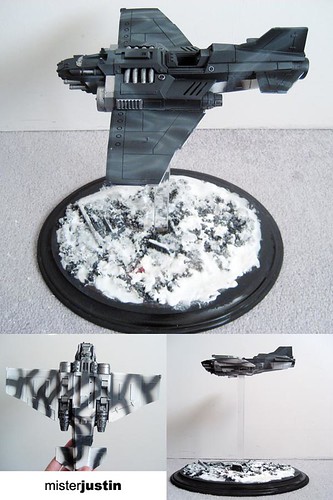 An early update on the Thunderbolt project. I am quite pleased with how the split urban camo scheme worked out - although I think that the snow on the base is a bit thick. There is still a lot of work to be done, of course. I'll add all of the detailing, weathering, chipping, wind streaking along the wings... some techniques that I've never applied before. This project has been a real pleasure and I intend to re-use the base idea for every future flyer. Labels: Bases, Commission, Forgeworld, GW, Imperial Guard, vehicle, WIP
 Materials: Wooden Base - craft store 3/4" x 10" square acrylic rod - plastics shop Glue, gravel and base materials 1/2" rare earth magnets - K & J Magnetics Two part plastic to anything epoxy I measured the base to find the center and simply epoxied the bejebbus out of the rod. I added two of the 1/2" magnets to the top using the same epoxy and one of them to the bottom of the Thunderbolt. After the epoxy was dried (I waited 10 minutes) I went back in with my gravel and debris. I was hoping that the magnets would be just strong enough to allow me to lift the entire display, base and all, by the flyer. It's not. It's strong enough to survive the customary bumps that come with life on a shelf. Labels: Bases, Commission, Forgeworld, Magnets, Technique, vehicle, WIP
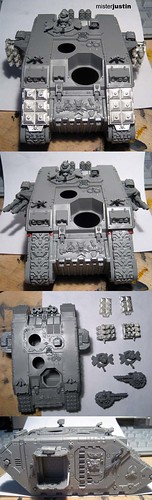 High temperatures recently have made it impractical to paint, and impossible to prime anything, so I decided to jump in on putting together a new model. Right away I knew it would be my new Land Raider but I couldn't decide whether to put it together as a plain ol' Land Raider or as the fancy Land Raider Crusader... which got me wondering why it had to be one or the other. Thank you rare earth magnets. I put together the body in the normal fashion and embedded four rare earth magnets (1/8" x 1/32" each) in to the top sponson mount on each side. I cut the top pivot from each of the sponson weapons and added magnets there instead -- two each to the Crusader sponsons, because they're metal, and one each to the standard plastic weapons. The red dots on the front helped me mark where to embed the tiny 1/16" x 1/32" magnets to hold the Crusader frag launchers in place. There are six of the tiny magnets in the body and three in the launcher... for each hole. The more magnets the better the hold - and I can hold this thing upside down without anything falling off. The pintle gunners will be swappable as magnets won't really work there. I will also make the front mounted guns swappable once I order a second housing. When I'm finished it won't take more than a few seconds to switch between a Land Raider and a Land Raider Crusader. Of course I don't have one in my 750 point army list but it will still be a pleasure to paint... as soon as I'm done with at least one other project. Labels: conversion, Magnets, Technique, vehicle, WIP
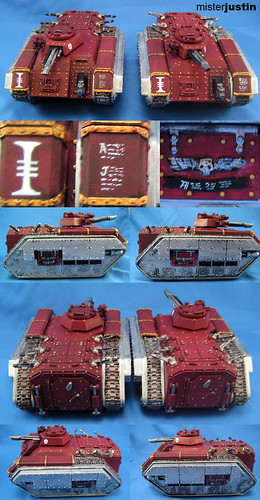 A pair of Tier 1 Chimeras to match a Daemonhunter army. These bad boys will transport the Stormtroopers in CancerMan's ( Relic forum) army. The freehand was added when the project came in under the allotted time. Overall I'm quite pleased and got the green light today. Labels: Commission, Daemonhunters, GW, vehicle
 Tier 1 Black Templar Rhino and Razorback. These vehicles will join the Black Templar Predator I did awhile back. With the Black Templar stuff I've been painting, and the black and white scheme for Niroe's army, is it any wonder that I will be fielding a Black Templar army of my own? Labels: Black Templar, Commission, GW, Space Marines, vehicle
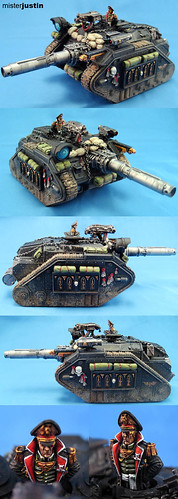 Another piece for Bill's armoured company. This is his conversion and I think that it really came together. If you're going to put a Commissar in a tank then that tank needs to be able to blow the bejesus out of other tanks -- and this can do just that. Quite the intimidating piece of equipment. This one was painted to the Tier 1 standard -- but with all of the detail on the model I think that it really pops even at that level. Just a superb model. Labels: Commission, conversion, GW, Imperial Guard, vehicle
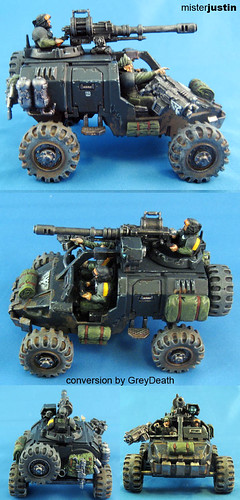 Unless I get change requests back from the client this one should be ready to go. The conversion work was done by GreyDeath of the "Work In Progress" forums -- and the commission was for a Tier 1 (aka gaming standard) paint job. I put some extra work in to the body of the jeep because it was 1) a real pleasure to paint and 2) good practice for my weathered black. The mud glaze was done a bit thick intentionally as I thought a gun jeep would have a bit more than a touch of dirt in the corners. On a Tier 2 model I might have gone so far as to glue "mud" along the lower portion of the jeep if the client wanted it. In the end quite pleased with the result. I hope the client is as well. Labels: Commission, conversion, GW, Imperial Guard, vehicle
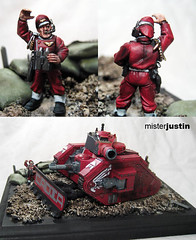 The first of the Cadian guards for the display base is finished. I started with the tank commander that came with the model and I'm pretty pleased with the result. Now that the model is starting to come together I no longer plan on keeping the "CADIA" text on the dozer blade. I will probably strip this and replace it with the Cadian flag or similar iconography. Labels: GW, Imperial Guard, vehicle, WIP
 I finally had an opportunity to put some time in to the Leman Russ project again. In this case I based all of the gun barrels in a gunmetal blue;added the Cadian gate iconography to the front of the tank; and completed the highlighting and first round of details on the turret. I also managed to get a GIANT RED FINGERPRINT on the finished black side of the turret. I will correct this when I go back in to highlight and detail the body. The turret took about two hours to get from the base colour to the current state. I expect to put in another hour before I decide it's finally finished... not counting the application of snow when the model is finished. It's likely to be awhile before I come back to this one, however, as the next commission models just arrived. Labels: GW, Imperial Guard, vehicle, WIP
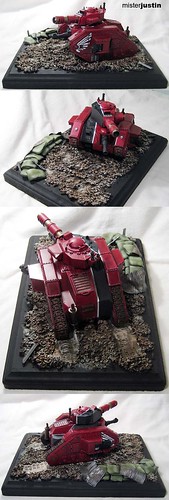 Not a lot of progress at this point but I am very happy with what has been done. Overall I think that the model is progressing very well and may well be competition worthy if I ever manage to finish... and stop changing my mind about the details and little touches. Something learned: if you're going to attach a vehicle to a display base mark out the location before adding any basing materials... and leave that area bare. I had to go back in with a screwdriver and clear spots for the tank to sit - otherwise it was sitting too high, didn't rest on the tread marks I had added, and ultimately looked like an afterthought. I plan to make some additional progress tonight and should have an update to post in the next couple of days. I would like to have this one finished within the next couple of weeks so that I can focus on other projects. Here's hoping. Labels: GW, Imperial Guard, vehicle, WIP
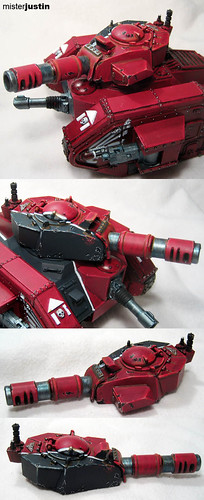
 After painting so many tanks on commission I decided it would be fun to paint one to a display quality for myself. I have no idea why I thought this would be fun but it's too late to turn back now. At this stage I have only completed the first of at least three highlights on the red. No highlights on the black yet. I am also going to try and remove and replace the lettering on the front -- it seemed straight at the time. Oops. Still a long, long way to go - including a display base. I intend to have the plow beaking apart a barrier on a tiered wooden base. The model will be removable for possible game play. Right now I'd say I am no more than 5% complete. That's five, not fifty. Good thing I have other projects -- this one is going to drive me nuts before I'm finished. Labels: GW, Imperial Guard, vehicle
|
